


Here, we will introduce the tools and procedure recommended by KAMUI for changing a tip.
Many players can not exchange tips themselves.
However, being able to exchange and maintain your own tools is an indispensable element in the progress along the process of improved playability.
KAMUI thinks that by doing personal maintenance of your tools, knowledge of and commitment to the tools will result, and enable the selection of tools that match your conditions and play style.
Since the tip is the only part of the billiard equipment that comes into contact with the cue ball, it has a huge impact on your performance.
Being able to exchange and maintain this tip by yourself is an essential element for players aiming to improve their performance.
Since the method to be introduced here is one of a number of tip changing methods, you may find your own way by holding to the basic principles.
However, it is important to understand the essence of each process.
Each process has its own purpose, so please hold firm to that aim.
①Tools
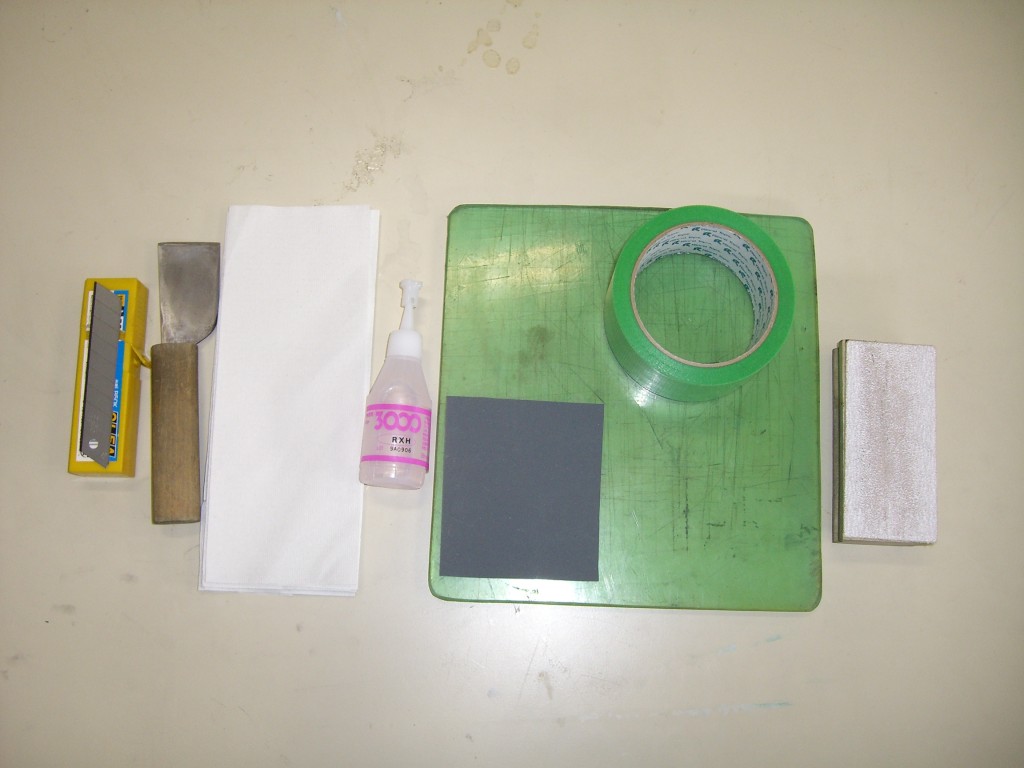
Starting from the left、
a, cutter blade (You should use a fresh blade every time)
b, Knife (Please keep the knife sharp. Blunt knife is not good for smooth replacing)
c, Paper towel
d, Sticky instant adhesive
(Please use sticky one so that the adhesive can stay on the surface of glue side.)
E, Sandpepr (#1500~2000 grit)
F, Masking tape
G, Rubber board
H, Sanding tool #180 girt (Please use a large and hard sanding tool so that you do not hurt your ferrule)
② Shave off the old tip on your cue and Flatten the ferrule perfectly
1, Shave off the old tip. You do not have to shave all of it on this step.
2, Remove all part of the tip with a knife.
3, Put a cutter blade on the ferrule and flatten the ferrule by turning around the ferrule NOT the blade.
This process is very important for good adhesive strength. Make sure to make the ferrule flat and smooth.
4, Tape the ferrule with masking tape so that you can keep the ferrule clean from adhesive.
③Buff the gluing surfaces of “glue” side and Flatten the glue side
1, Hold the tip and move a cutter blade from side to side
2, Turn around the tip 90 degrees and keep Step 1 process until the ‘glue’ stamp is gone and the glue side become flat.
3, You can put a cutter blade and turn around the tip to buff the glue side. Make sure the glue side has to be flat for good gluing. You can also use sandpaper to buff . But make sure that the glue side of the tip has to become flat.
4, Confirm if the glue side becomes flat with the cutter blade.
5, Brush the glue side and make it clean.
④Gluing
1、Please use a sticky instant adhesive so that the adhesive remains on the surface of the glue side.
2, Put a few drops of the adhesive on the center of the glue side. You do not have to put a lot. DO not put it on the whole part of the glue side. The surface of adhesive gets polymerized and the adhesive strength is weakened.
3, Press the ferrule to the glue side. Please press vertically and do not move from side to side.
4, Press the tip hard and wipe the adhesive on the side of the ferrule. Please wait for a while. It depends on what adhesive you use.
⑤ Shave the excess overhang part of the tip roughly
1, Put your shaft on the rubber board.
2, Shave off the excess overhang part by the knife. We will do complete shaving on the next step, so just roughly shave off the excess overhang.
3, Take out the masking tape.
⑥Shave the excess overhang making the tip flush with the ferrule
1、Put the edge of the knife on the side of tip. Please keep the knife edge and the ferrule flat.
Please watch the video and learn how to use the knife and shaving. You may need to practice for this process.
2, Turn around the shaft and shave from the shaft side to top side. By putting sand paper between the knife and ferrule, you can shave smoothly.
3, Shave the tip to your desired radius with the knife roughly.
⑦Shave the tip to your desired radius
1, Sit on a chair and put the shaft on your knees. Please use a wide sanding tool so that you do not hurt your ferrule. We recommend around #180 grit.
2, Turn around the shaft back and forth and shave the tip. You can cover the ferrule with masking tape for protection.
3, Please shave the tip from top to bottom. Shaving bottom to the top may cause delamination.
⑧Varnishing the side of tip
1, Fold the end of #1500-2000 and sandpaper.
2, Put the folded part on the side of tip and turn around the shaft back and forth until the surface of the tip becomes smooth. Sanding with #400-600 sandpaper beforehand makes this varnishing process easier.
3, Put varnishing liquid on the side of tip and varnish it with cloth or paper towel. Coating the side of tip protects the tip from moisture so that the tip lasts longer.
4, Clean the ferrule and you are done!